


18" 19" 20" Wheel Covers Graphic Aerodisc Style for Tesla Model 3/Y
🎁Spring Sale 15% off! Use code: SP15
-
Free Shipping: On all orders over $99
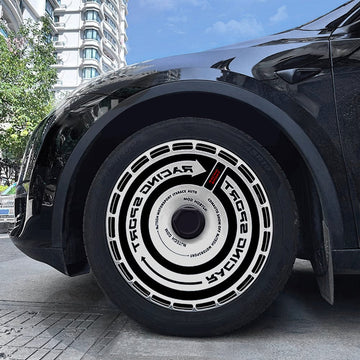
18" 19" 20" Wheel Covers Graphic Aerodisc Style for Tesla Model 3/Y
Features

Stylish Custom Wheel Covers
TesFlex custom graphic aerodisc wheel covers provide a stylish and personalized look, allowing you to create a unique appearance for your Tesla.

Make A Huge Difference
TesFlex DIY Custom Graphic Aerodisc Wheel Cover uses full-color graphic design, having a better look, effectively reducing wind resistance, and enhancing the sense of power and movement.

Easy to Install
Installation is a breeze, and they fit the tire tightly and securely. They won't make any noise while driving, even at highway speeds.

Full Protection
The TesFlex full coverage wheel covers not only protect my rims from scratches and damage but also give your vehicle a whole new level of elegance and sophistication.
Package Include
4 x wheel covers
4 x wheel center cap kit
1 x soundproofing cotton
Installation
Installation is a quick and easy process. Follow these simple steps to ensure a secure fit and optimal performance.
What You’ll Need:
✔ A clean, dry cloth
✔ Your set of 4 Wheel Covers
✔ Gloves (optional, for better grip)
Step-by-Step Installation:
Step 1: Prepare the Wheels
- Ensure the wheels are clean – Use a dry or slightly damp cloth to wipe off any dust or debris from the wheel surface.
- Check the alignment tabs – Inspect the back of the wheel covers to familiarize yourself with the locking mechanism.
Step 2: Position the Wheel Cover
- Align the valve stem cutout – Each wheel cover has a designated cutout for the tire’s valve stem. Ensure this cutout aligns properly with the valve stem on your wheel.
- Check for even positioning – The cover should sit evenly around the wheel before pressing it into place.
Step 3: Secure the Wheel Cover
- Apply even pressure – Begin by pressing the top section first, then work your way around the edges.
- Snap it into place – Firmly push the cover until you hear multiple clicks, indicating that the clips are securely attached.
- Check for gaps – Run your hand around the edges to ensure the cover is flush with the wheel.
Step 4: Verify Installation
- Gently tug on the cover to confirm it is firmly attached.
- Test drive at low speed (5–10 mph) to ensure the wheel covers remain secure.
- Recheck after driving – If any cover feels loose, remove it and reinstall following the above steps.
How to Remove the Wheel Cover
- Firmly grip the edges of the wheel cover with both hands.
- Pull outward with even pressure – Start at one side and gradually work your way around.
- Gently wiggle if necessary to release the clips without forcing them.
Additional Tips:
✅ Use the included silent stickers to reduce vibrations and enhance stability.
✅ Avoid using excessive force during installation to prevent damage to the clips.
✅ Recheck fitment periodically to ensure long-term security.
Shipping
Shipping Time:
North America: 10-15 business days
South America, Europe, Asia, Oceania and Other regions : 10-15 business days
Shipping Costs:
1. Standard shipping for orders under $99 (shipping fee: $9.9).
2. Free shipping for orders on $99 and above.
Returns
We have a 30-day return & exchanges policy, which means you have 30 days after receiving your item to request a return or exchanges.
Recently Viewed Products


